photo by James Wheeler from Pexels
Originally published for Afterman Software
Posts in this Series:
- Part 1: Endpoint Implementation (this post)
- Part 2: Deploy with Visual Studio Publish
- Part 3: Pulling Back the Curtain on Visual Studio Publish
- Part 4: Build and Deploy with Azure DevOps
The technology world has changed greatly since NServiceBus was first introduced in 2006. Back then, the framework made very specific assumptions about transport and persistence needs because there wasn't much more than MSMQ, Sql Sever and MSDTC to chose from in the .NET ecosystem.
Fast forward 14 years and the world is a very different place. A plethora of transports and persistence to choose from. The cloud. The death of distributed transactions. And a new .NET framework that can run on any operating system.
The cloud, and more specifically, Azure, has brought its own set of hosting capabilities.
- Azure Virtual Machines (VM's)
- Azure App Services
- Azure Container Instances
- Azure Kubernetes Service
- Azure Service Fabric
And as the cloud slowly becomes the norm rather than the exception, frameworks built with .NET have to find a way to run in these new hosting models.
This post is the first in a series on how to code, build, deploy and run an NServiceBus endpoint in Azure App Services. Why App Services? It offers a nice stepping stone to a middle ground between the VM world and some of the more complex hosting models like Docker containers in ACI or AKS.
In this post, we'll create a .NET 3.1 Core console application which runs an NServiceBus endpoint in a hosted service in the .NET Core Generic host.
Prerequisites
In order to run the solution locally, you'll need:
- Visual Studio 2019
- .NET Core 3.1
- Sql Server Express or LocalDb: Azure Storage Emulator has a dependency on Sql Server.
- Azure Storage Emulator
- Azure Account: although we won't be using it in this post, you'll need it all subsequent posts.
Before You Begin
All code presented in this series is derived from the Self-Hosting in Azure WebJobs sample on Particular Software's website. Their sample leverages the WebJobs SDK by calling ConfigureWebJobs when configuring the generic host.
After exploring that solution, I realized an NServiceBus endpoint doesn't need any of the underlying WebJob SDK's functionality to run as a WebJob. The generic host already provides some of the configuration that ConfigureWebJobs does, and the rest, like triggers and bindings, you don't need. As a result, I've omitted the call to ConfigureWebJobs during host configuration for the code in this post. Why? We're not writing a WebJob as much as we're creating an empty WebJob to host our NServiceBus endpoint.
The WebJobs SDK is very powerful and provides the underlying runtime for other services like Azure Functions. I highly recommend reading Microsoft's doco's to familiarize yourself with the SDK and what the runtime has to offer.
Coding the Endpoint
Feel free to follow along and build the code with me or download the finished code for Part 1 from my GitHub account.
Project Creation and Dependencies
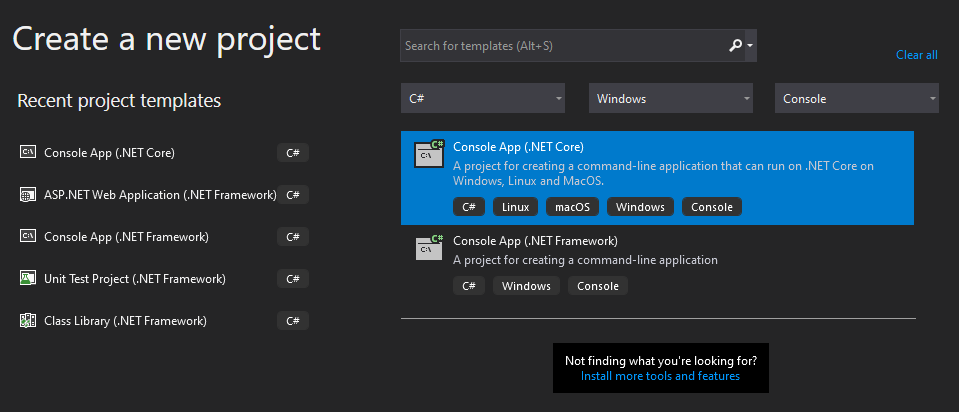
To start, create a new .NET Core console app called NSBEndpointInWebJob
Make sure the project targets the .NET Core 3.1 framework:
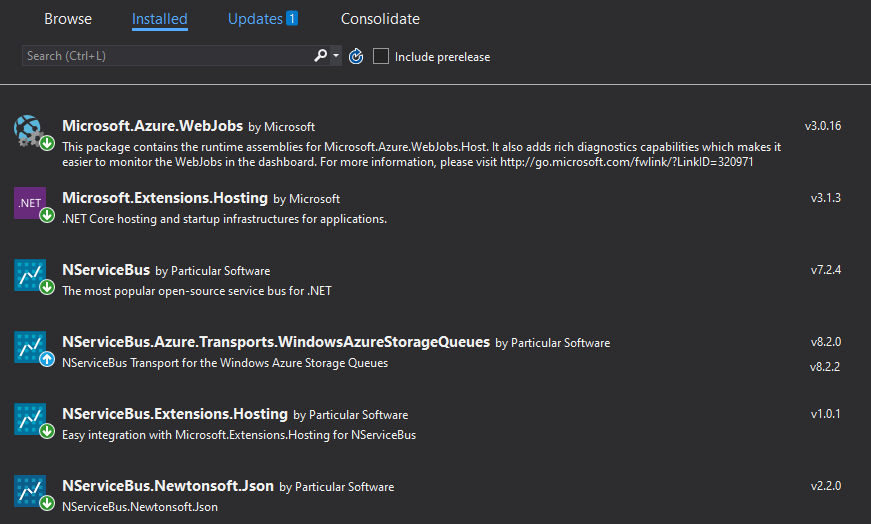
Next, add the following NuGet packages to your solution.
Project Configuration
appsettings.json
We need a place to store configuration settings for the project, so add an appsettings.json file with this code
{
  "AppSettings": {
    "TransportConnectionString": "UseDevelopmentStorage=true"
  }
}
We're setting the TransportConnectionString value to UseDevelopmentStorage=true. If you haven't worked with Azure Storage Emulator before, that connection string is going to look... strange. UseDevelopmentStorage=true means "use the Azure Storage Emulator for my queues instead of a real Azure resource".
I'm putting the connection string in the AppSettings section to set the project up for easy publishing in Part 2. I'll be moving the connection string to a better location in a subsequent post in the series.
Remember to set appsettings.json's Copy to Output Directory value to "Copy if newer" to make sure it's included as a build artifact.

launchSettings.json
.NET Core's environment defaults to "Production". Technically, this equates to the DOTNET_ENVIRONMENT environmental variable being assigned a value of "Production" by the framework. This default is true even when running locally.
In order to set the environment to Development when running locally, open up the project's properties and go to the Debug tab. Add an new environmental variable with the name DOTNET_ENVIRONMENT and set the value to Development
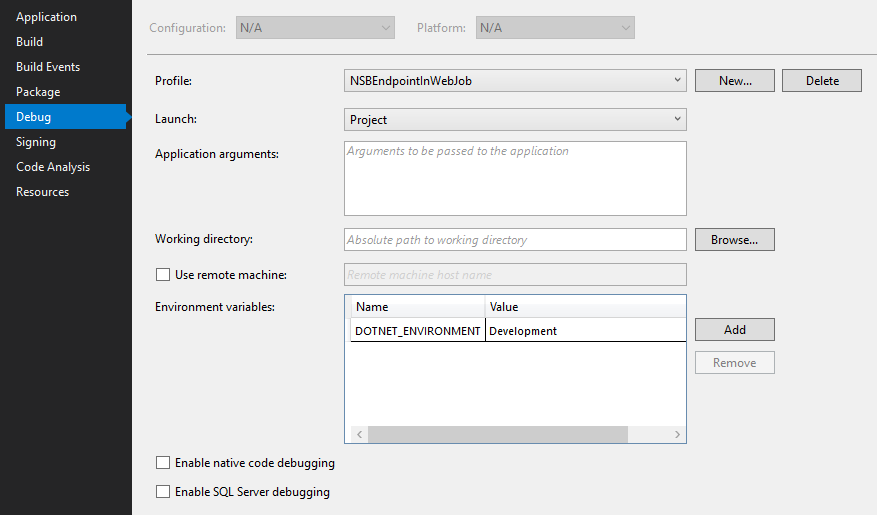
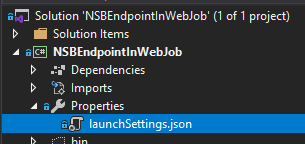
After saving the Debug properties, you'll see a new file called launchSettings.json appear under the Properties section of the project
with this content
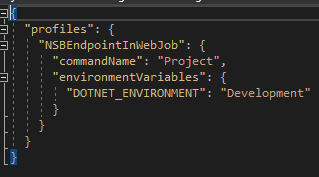
Note the name/value pair you added in the Debug properties is present in the environmentalVariables section of the generated json.
There are other ways to set the environment for local development. For brevity, I will not be digging into those other options in the post to keep it moving along. You can learn more here and here
Program.cs
Now our application is ready for some code! Open the Program.cs file that was created when your created the project and replace it with this code:
class Program
{
    static async Task Main(string[] args)
    {
        var host = Host
            .CreateDefaultBuilder()
            .ConfigureHost()
            .Build();

        var cancellationToken = new WebJobsShutdownWatcher().Token;
        using (host)
        {
            await host.RunAsync(cancellationToken).ConfigureAwait(false);
        }
    }
}
Host.CreateDefaultBuilder() creates a Generic Host with pre-configured defaults for things like HostConfiguration, AppConfiguration, Logging, etc... It's possible to configure your own host using new HostBuilder() if you want to take full control over generic host configuration. To keep things simple, I'll leverage the pre-configured defaults in CreateDefaultBuilder.
You should be seeing a complier error for the ConfigureHost() method, let's add that next.
HostBuilderExtensions.cs
Next, add a new class named HostBuilderExtensions with this code.
public static class HostBuilderExtensions
{
    public static IHostBuilder ConfigureHost(this IHostBuilder hostBuilder)
    {
        hostBuilder.UseNServiceBus(ctx =>
        {
            Console.Title = "NSBEndpointWebJob";
            var endpointConfiguration = new EndpointConfiguration("NSBEndpointWebJob");

            var section = ctx.Configuration.GetSection("AppSettings");
            var transportConnectionString = section.GetChildren().Single(x => x.Key == "TransportConnectionString").Value;

            var transport = endpointConfiguration.UseTransport<AzureStorageQueueTransport>();
            transport.ConnectionString(transportConnectionString);
            transport.SanitizeQueueNamesWith(queueName => queueName.Replace('.', '-'));

            endpointConfiguration.UsePersistence<InMemoryPersistence>();
            endpointConfiguration.UseSerialization<NewtonsoftSerializer>();

            endpointConfiguration.SendFailedMessagesTo("NSBEndpointWebJob.Error");
            endpointConfiguration.AuditProcessedMessagesTo("NSBEndpointWebJob.Audit");

            endpointConfiguration.DefineCriticalErrorAction(OnCriticalError);

            endpointConfiguration.EnableInstallers();

            return endpointConfiguration;
        });

        hostBuilder.ConfigureServices((context, services) =>
        {
            services.AddHostedService<SayHelloHostedService>();
        });

        return hostBuilder;
    }

    private static async Task OnCriticalError(ICriticalErrorContext context)
    {
        var fatalMessage = $"The following critical error was encountered:{Environment.NewLine}{context.Error}{Environment.NewLine}Process is shutting down. StackTrace: {Environment.NewLine}{context.Exception.StackTrace}";
        EventLog.WriteEntry(".NET Runtime", fatalMessage, EventLogEntryType.Error);
        try
        {
            await context.Stop().ConfigureAwait(false);
        }
        finally
        {
            Environment.FailFast(fatalMessage, context.Exception);
        }
    }
}
The ConfigureHost method in this class takes care of any further configuration needed that CreateDefaultBuilder does not already set, which is mainly NServiceBus configuration and adding a hosted service to the generic host.
NServiceBus Configuration
The first line in ConfigureHost is a call to hostBuilder.UseNServiceBus.
hostBuilder.UseNServiceBus(ctx => { ... }
This extension method is provided by Particular Software in the NServiceBus.Extensions.Hosting nuget package. It provides a nice extension point to configure our endpoint in the generic host.
Let's move through the lines of the UseNServiceBus method:
var endpointConfiguration = new EndpointConfiguration("NSBEndpointWebJob");
This line creates a new endpoint configuration using NserviceBus's self-hosting model.
Next, we'll load the app configuration from the HostBuilderContext (ctx):
var section = ctx.Configuration.GetSection("AppSettings");
var transportConnectionString = section.GetChildren().Single(x => x.Key == "TransportConnectionString").Value;
Next is transport configuration (Azure Storage Queues)
var transport = endpointConfiguration.UseTransport<AzureStorageQueueTransport>();
transport.ConnectionString(transportConnectionString);
transport.SanitizeQueueNamesWith(queueName => queueName.Replace('.', '-'));
SanitizeQueueNamesWith takes a delegate to remove any invalid characters from the queue name that are not supported by Azure Storage Queues. NSerivceBus builds the name of the queue from the endpoint name you specify when creating a new endpoint instance. If this name has any "."'s in it, those invalid characters will throw an exception when the endpoint starts. There are a good amount of restrictions around characters and length in Azure Storage Queues names, so best to include this in your transport configuration.
Skipping past persistence and serialization configuration we configure a critical error action
endpointConfiguration.DefineCriticalErrorAction(OnCriticalError);
DefineCriticalErrorAction takes a delegate with this implementation:
private static async Task OnCriticalError(ICriticalErrorContext context)
{
    var fatalMessage = $"The following critical error was encountered:{Environment.NewLine}{context.Error}{Environment.NewLine}Process is shutting down. StackTrace: {Environment.NewLine}{context.Exception.StackTrace}";
    EventLog.WriteEntry(".NET Runtime", fatalMessage, EventLogEntryType.Error);
    try
    {
        await context.Stop().ConfigureAwait(false);
    }
    finally
    {
        Environment.FailFast(fatalMessage, context.Exception);
    }
}
This method dumps the stacktrace to the event log and attempts to shut down the endpoint gracefully.
Configure Services
The final configuration in the ConfigureHost method is adding a hosted service to Generic Host.
hostBuilder.ConfigureServices((context, services) =>
{
    services.AddHostedService<SayHelloHostedService>();
});
This code will run when the host starts. Because we haven't coded SayHelloHostedService yet, we should be seeing compiler errors. Let's add it next.
SayHelloHostedService.cs
Add a new class to the project called SayHelloHostedService and with this code:
public class SayHelloHostedService : IHostedService
{
    public SayHelloHostedService(IServiceProvider provider)
    {
        this.provider = provider;
    }

    public Task StartAsync(CancellationToken cancellationToken)
    {
        worker = SimulateWork(cancellationTokenSource.Token);
        return Task.CompletedTask;
    }

    public Task StopAsync(CancellationToken cancellationToken)
    {
        cancellationTokenSource.Cancel();
        return worker;
    }

    async Task SimulateWork(CancellationToken cancellationToken)
    {
        try
        {
            var session = provider.GetService<IMessageSession>();
            while (!cancellationToken.IsCancellationRequested)
            {
                await session.SendLocal(new SayHello()).ConfigureAwait(false);
                await Task.Delay(2000, cancellationToken).ConfigureAwait(false);
            }
        }
        catch (OperationCanceledException)
        {
        }
    }

    readonly IServiceProvider provider;
    readonly CancellationTokenSource cancellationTokenSource = new CancellationTokenSource();
    Task worker;
}
This class allows the generic host to "start" and "stop" the service. In StartAsync, SimulateWork is invoked, which retrieves an NServiceBus IMessageSession using the injected IServiceProvider. Once we have a hold of the message session, we can dispatch a message.
In this case, we're dispatching a command every 2 seconds. Until StopAsync is invoked by the generic host, this loop will continue to run. You should be seeing complier warnings for SayHello(). Let's add that command and its handler next.
Command and Handler
It's time to add our NServiceBus command and handler. Add a new class file called SayHello to the project with this code:
public class SayHello : ICommand
{
}
Best practice is to use unobtrusive mode to register messages with NServiceBus instead of the marker interfaces (ICommand, IEvent and IMessage). To keep things simple, I'm going to use the marker interfaces for now.
Then add a new class, SayHelloCommandHandler with this code:
public class SayHelloCommandHandler : IHandleMessages<SayHello>
{
    private static readonly ILog Logger = LogManager.GetLogger<SayHelloCommandHandler>();

    public Task Handle(SayHello message, IMessageHandlerContext context)
    {
        Logger.Info("hello ...");
        return Task.CompletedTask;
    }
}
The handler simply logs "hello ...". This logging will be helpful later when we publish the endpoint to an Azure App Service to assure it's up and running.
Running the Project
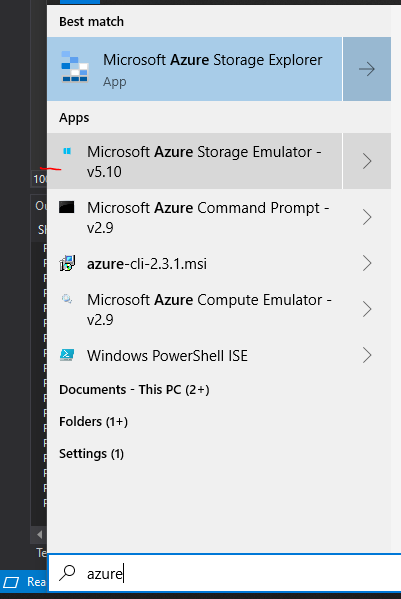
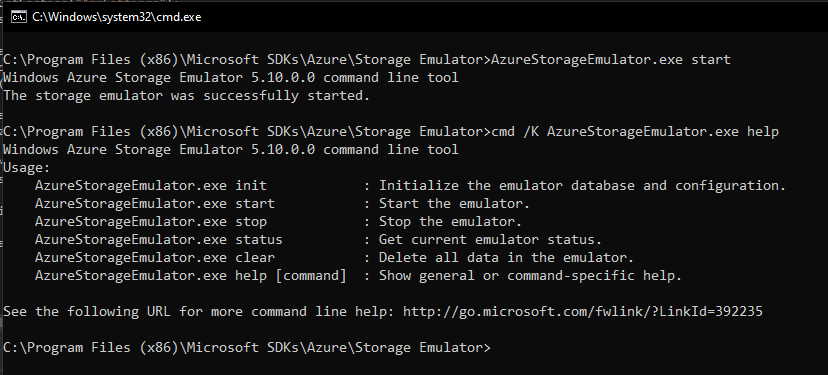
Our implementation is done! The one last thing we have to do before hitting F5 is start the Azure Storage Emulator.
Once started, the console of the emulator should look like this:
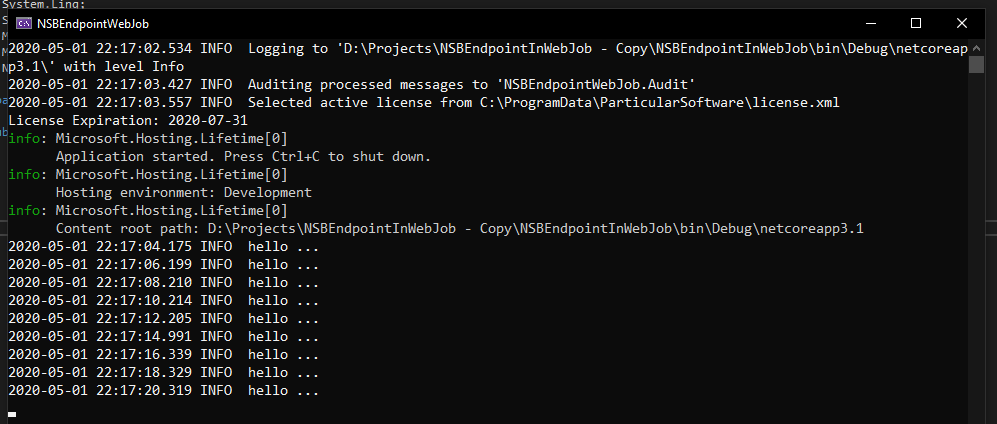
With the emulator started, hit F5 and you should see an NServiceBus endpoint running in a console app which is running as a hosted service in the generic host
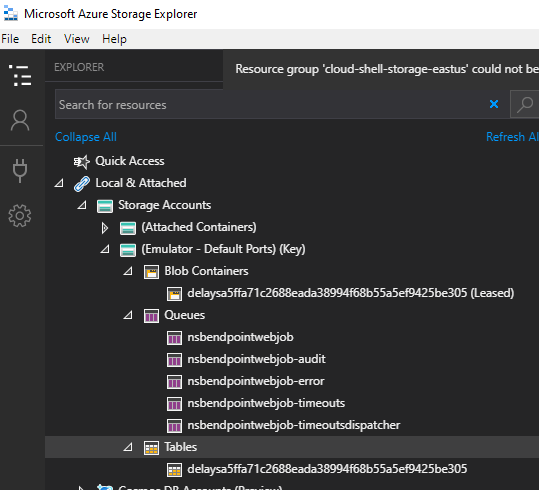
If you have Azure Storage Explorer installed or using Visual Studio's Cloud Explorer, you can examime the azure storage artifacts created by NServiceBus
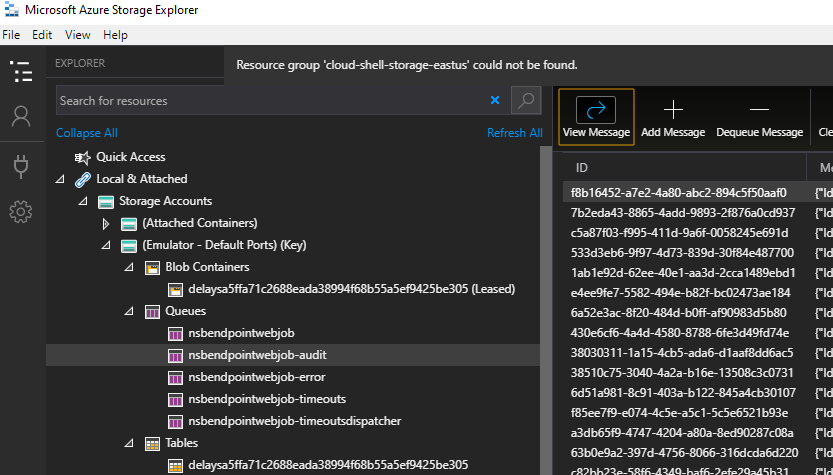
Looking at the audit queue lets you see every message your endpoint has proccessed
In Closing
In this post, we created a .NET 3.1 Console application that hosts an NServiceBus endpoint in a hosted service in the generic host. I explained the pertinent parts of the code, mainly around application settings, host configuration and NServiceBus configuration. Then, with Azure Storage Emulator providing our backing transport (Azure Storage Queues), we ran the endpoint and watched the log output to the console window.
So,what's the big deal? How many times have you run an NServiceBus endpoint on your local machine? The REAL value here is doing something with it!
The next post will explore how to deploy the endpoint to Azure App Services using Visual Studio's right-click Publish functionality.
References
- "Self-Hosting in Azure WebJobs": https://docs.particular.net/samples/azure/webjob-host/
- "How to set the hosting environment in ASP.NET Core": https://andrewlock.net/how-to-set-the-hosting-environment-in-asp-net-core/
- "How to use the Azure WebJobs SDK for event-driven background processing": https://docs.microsoft.com/en-us/azure/app-service/webjobs-sdk-how-to
- "Get started with the Azure WebJobs SDK for event-driven background processing": https://docs.microsoft.com/en-us/azure/app-service/webjobs-sdk-get-started
- "Building Messaging Endpoints in Azure: WebJobs": https://jimmybogard.com/building-messaging-endpoints-in-azure-webjobs/


