

This is the fourth post in my Containerizing NServiceBus Endpoints with Docker Series
Part 1: Introduction/Readying your System/Local Azure Resources
Part 2: Live Azure Resources
Part 3: Dockerize!
Part 4: Docker Compose
Part 5: Containerizing Sql Server and switching to Sql Persistence
In parts 1, 2 and 3 of this blog series you configured and ran an NServiceBus solution in containers using Docker. In this post, we'll look at how docker-compose can simplify building images and running containers.
docker-compose
docker-compose orchestrates the creation of images and the running of containers without having to use docker build to build the images, and docker run to run them.
In Part 3, you were doing the "command line shuffle", changing directories to where the Dockerfile was for each respective container in order to build images and create containers from those images. The advantage of using docker-compose is a single point of orchestration of one of more Dockerfiles from a central location as well as a logical grouping of your "application".
I've updated the GitHub repository we've been using throughout the series by adding a docker-compose.yml file that we'll use in conjunction with the docker-compose command.
docker-compose.yml
The docker-compose.yml file contains the directions for Docker to follow when running docker-compose. Let's take a look at the .yml file from the solution:
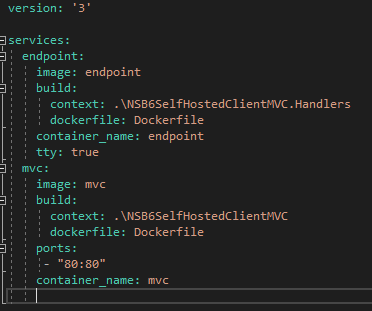
In most .yml files, you'll find one or more top-level "keys" that defines "sections". Under each "section" are multiple sub-topics, and so on and so on. In the .yml file in the solution, we have one top-level key, services, and two sub-topics, endpoint and mvc, each of which represent a container we want to run.
Let's decompose both sub-topics, starting with the mvc section first.
MVC Section
Directly under the mvc section is the image key. This key specifies the name of the image written to disk when docker-compose runs. The build key contains two other sub-topics; the context key, which is a path where docker-compose.yml is to the Dockerfile from which we want to build the mvc image. The second key is the dockerfile key, which is optional, unless you want to name your Dockerfile something other than "Dockerfile".
Making our way back "up" a sub-topic, ports allows us to pass in a port mapping between the host and the container. If you remember from Part 3, this is how we ran the mvc container:
docker run -d -p 80:80 nsbmvc
We used the -d parameter to tell Docker we wanted the container started in detached mode, and the -p parameter to tell Docker the port mapping we want between the host and the container. Since we're not running the container with docker run, but rather, using docker-compose, we can pass in the port mapping using the .yml file.
Finally, the container_name key allows us to name the container that will be created by running the mvc image.
Endpoint Section
The image, build, context, dockerfile and container_name keys in the endpoint section are the same as the keys in the mvc section and do the same thing, so we won't revisit them. The one key that is different is the tty key.
The tty key is used to prevent the endpoint container from exiting after it's been started. If you remember from Part 3, when we ran the endpoint container, we did so like this:
docker run -it nsbendpoint powershell
Using the -it parameter and passing in powershell meant that when the container started, we were "bound" to the container's command line and dropped into a powershell session. That kept the container from exiting.
tty: trueis the "equivalent" of[COMMAND] -itfordocker-compose.
Now that we've seen how docker-compose.yml works, it's time to run docker-compose to build our images and run our containers!
docker-compose up
docker-compose up builds, (re)creates, starts, and attaches to containers for a service using the information in the docker-compose.yml file.
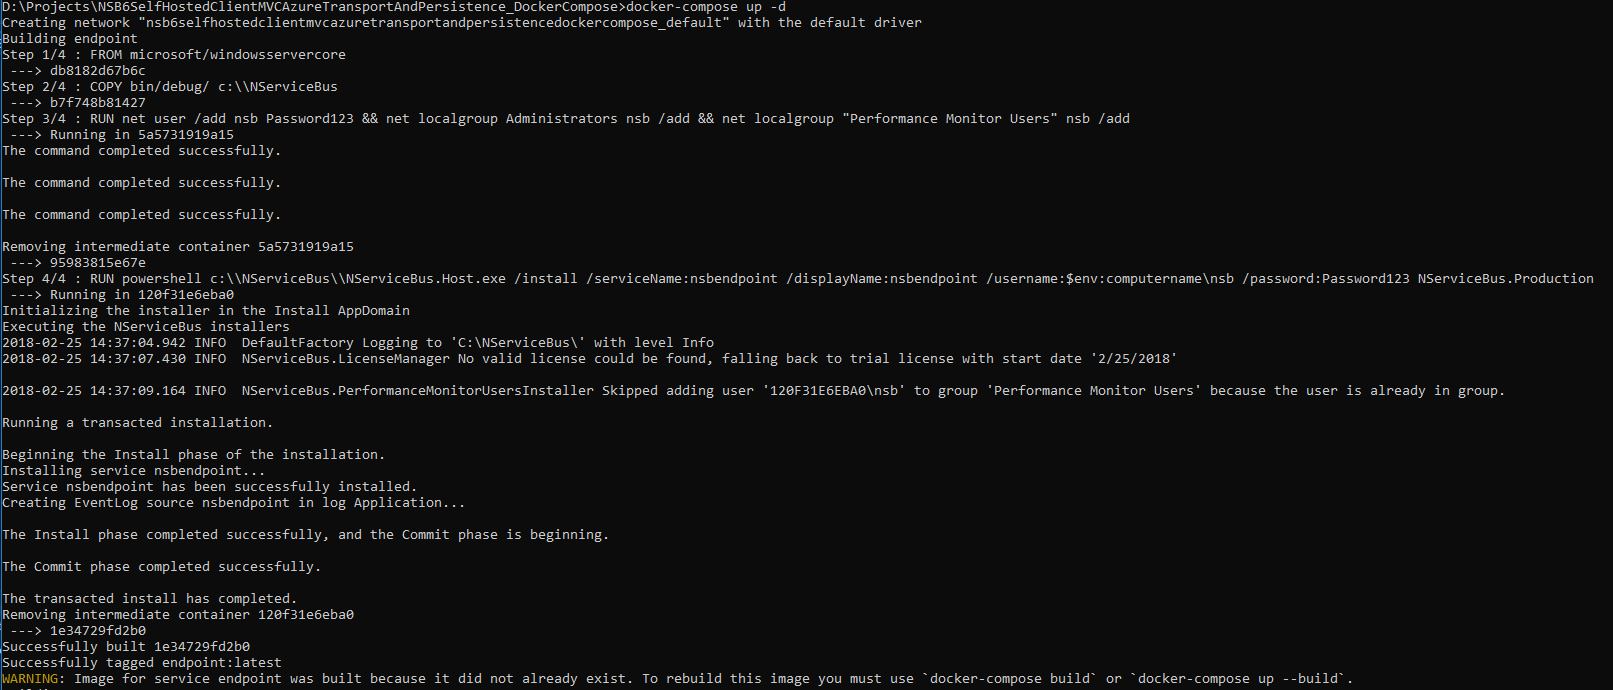
The docker-compose.yml file is located in the \NSB6SelfHostedClientMVCAzureTransportAndPersistence folder at the same level as the solution file. Drop to a command prompt (run as administrator) in this folder and run the following command:
docker-compose up -d
By default, docker-compose will look in the the current directory for a docker-compose.yml file and use that to orchestrate the creation of both the images and running of containers. You're going to see a lot of output to the console. Let's break it down.
First, you'll see the endpoint image being built and tagged:
Docker then moves onto the mvc image:

At this point, Docker has built both images. Now it's time use those images to start the containers:
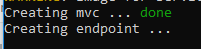
Congratulations! You just built two separate images and ran two containers using docker-compose.
To verify things are running as expected, get the mvc container's IP address by running:
docker inspect --format="{{range .NetworkSettings.Networks}}{{.IPAddress}}{{end}}" [MVC CONTAINER ID]
Open a new browser, paste the IP address in and you should see the generic MVC page after the web site initializes and sends the command to the NServiceBus endpoint.
To check that the NServiceBus endpoint running in the container handled the message, exec -it [CONTAINER ID] cmd into the endpoint container, cd to the NServiceBus folder, and type MORE [NSB LOG FILENAME].
Look for the following line near the end of the log file:
2018-02-22 16:33:50.307 INFO NSB6SelfHostedClientMVC.Handlers.TestCommandHandler handled TestCommand at [DATETIME] (UTC)
docker-compose down
Now that we've created the images for each of our containers and have running containers based on those images, it's time to clean up. docker-compose down offers a centralized clean-up.
In the same directory as the .yml file, run:
docker-compose down
This will stop the running containers and remove them. However, the images remain intact. You should see the following output:

Docker tells us it's stopping, then removing the mvc and endpoint containers. It also tells us it's removing the default network that was created in which the containers operate when using docker compose up
docker-compose downwill not remove any images created that might have been created bydocker-compose up
Wrapping Up
In this post, we looked at orchestrating multiple containers using docker-compose and the docker-compose.yml file. By using docker-compose as an orchestrator, we've logically grouped multiple containers together that make up our "application" and given ourselves a single entry point on the command line instead of tracking down each Dockerfile, building and image, and then running a container.
In the next post, we'll containerize Sql Server and change the NServiceBus persistence from Azure Storage to Sql Persistence. When that's finished, we'll add commands to our .yml file that will orchestrate the Sql Server container with the other containers using docker-compose.
Additional Resources
- Docker for .NET Developers (Part 4)
- https://docs.docker.com/compose/overview/ (Overview of Docker Compose)
- https://docs.docker.com/compose/compose-file/ (Overview of .yml files)