
This is the third post in my Containerizing NServiceBus Endpoints with Docker Series
Part 1: Introduction/Readying your System/Local Azure Resources
Part 2: Live Azure Resources
Part 3: Dockerize!
Part 4: Docker Compose
Part 5: Containerizing Sql Server and switching to Sql Persistence
In Part 1 and Part 2 of this blog series, you readied your system, downloaded the source code, procured Azure resources both locally and via the Azure portal and ran the solution utilizing those resources.
Now that the "plumbing" has been taken care of, it's time to Dockerize the solution!
Using Docker to build Images and Run Containers
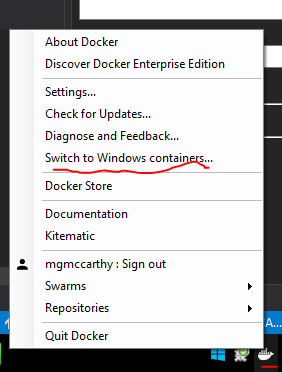
First and foremost, you need Docker installed. Head over here to get it. Once installed, open Docker and set it to run as Windows Containers:
Dockerfiles and .dockerignore
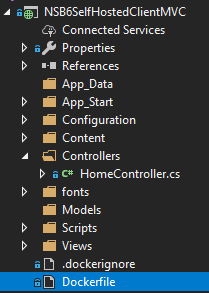
Now that we have Docker up and running correctly, let's take look at the Dockerfiles that are in the solution.
The solution includes two Dockerfiles (as well as two .dockerignore files), one in the ClientMVC project:
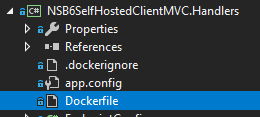
and one in the ClientMVC.Handlers project:
Let's have a look at the ClientMVC Dockerfile.
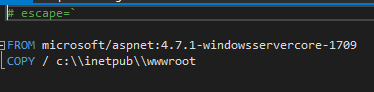
We're using the FROM command to set the microsoft/aspnet:4.7.1-windowsservercore-1709 image as base image. We're then using the COPY command to copy everything from the current folder to the image's c:\inetpub\wwroot folder.
The
# escape=`directive allows us to set the\character as a line break instead of the default Docker line break, which is a\character. The problem with\is on a windows containers, you're going to run into problems with container paths and line breaks. So best to set it to `.
The ClientMVC .dockerignore file is a bit more involved:
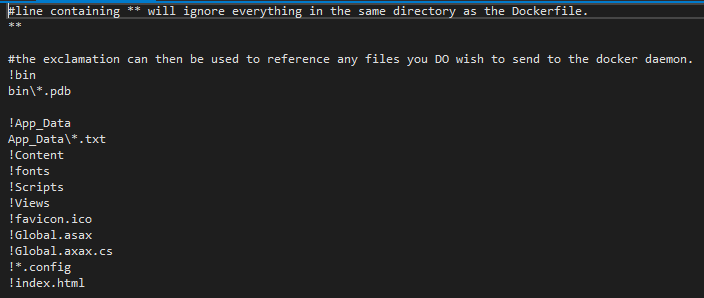
We're ignoring EVERYTHING in the Dockerfile directory (**), then white-listing what we want to include by prefixing it with a !. There are still folders and files being brought over that don't need to be, but like I mentioned in Part 1, I'm still new to Docker and still learning. This .dockerignore file got me close enough to get the MVC site running in a container.
Now let's look at the ClientMVC.Handlers Dockerfile:
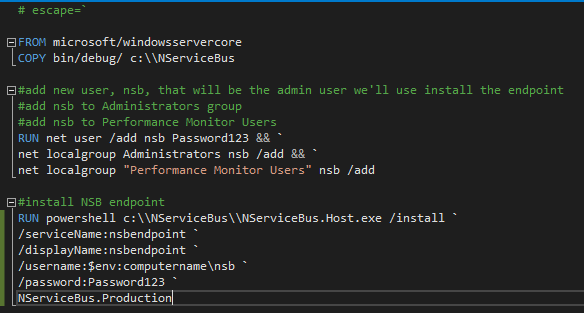
We're using the FROM command to build our new image starting from the base image microsoft/windowsservercore. The COPY command is then used to bring all the files from bin/debug (on our host) into the c:\NServiceBus folder that will be be created in the container.
The next three lines are all combined into one RUN command using && to "concatenate" the net statements together so Docker creates one layer for all net operations instead of one layer per net operation. Docker will also only create one intermediate container instead of three using this approach. It's typically a good idea to "group" common operations together into one RUN command to keep the number of layers in your image as small as possible. In this case, the group for this RUN command is user and group setup.
Next, we install the NServiceBus endpoint using the NServiceBus host. Note the use of $env:computername here for the /username value. The computer name is determined at runtime by the container, so you need to use this environmental variable to add the user to the local server running in the container.
Do not use the default container user,
User Manager\ContainerAdministratorfor operations like this. It will not work. For these types of operations, you should add a new user(s) and add those user(s) to new groups (https://blog.docker.com/2017/07/docker-windows-webinar-qa/)
We're also setting /serviceName:nsbendpoint and /displayName:nsbendpoint so we can easily identify the endpoint when it is installed as a windows service in the container.
Finally, let's take a look at the .dockerignore file for ClientMVC.Handlers:
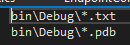
Very simple. I'm just excluding all .txt files (because I don't want to copy the NServiceBus logs on my local machine to the container) and .pdb files. Again, I need to optimize what I copy to the container, but this gets me up and running quickly.
Building Images
Now that we've looked at the Dockerfile and .dockerignore files for both projects, it's time to actually do some Docker work and build our images!
before building your images, in Part 2, we replaced the
connectionStringvariable in both the Global.asax and EndpointConfig.cs file with the real Azure connection string. Please be sure that both connection strings are still using the real Azure connection string (notUseDevelopmentStorage=true) before building the images.
make sure you clean and rebuild your solution as the "real" connection strings need to be compiled into the libraries about to be used to build images.
Open a command prompt (run as Administrator) and navigate to the downloaded solution on your machine. Then change directory to the NSB6SelfHostedClientMVC folder.

once there, issue the following Docker command:
docker image build --tag nsbmvc .
We're telling Docker to build an image, but how does Docker know "what" to build the image from? In this case, it's going to look in the current directory (denoted in the command by the trailing .) for a Dockerfile and use that to build the image. I'm using --tag here to give it a human readable name later so it's easier to work with. Your output should look similar to this:

The console tells you what steps are being executed in the Dockerfile as well as the layers that are being created to form your new "nsbmvc" image.
Now it's time to build the image for the NServiceBus endpoint. Change directory up one level, then into the NSB6SelfHostedClientMVC.Handlers directory.

once there, issue the following Docker command:
docker image build --tag nsbendpoint .
Building this image will take significantly longer than the "nsbweb" image we just build. Why? After the FROM and COPY commands are run, the user and group operations execute via the RUN command, which takes a bit of time. The last step, installing the NServiceBus endpoint will take the longest. When the image is built, your output should look similar to this:
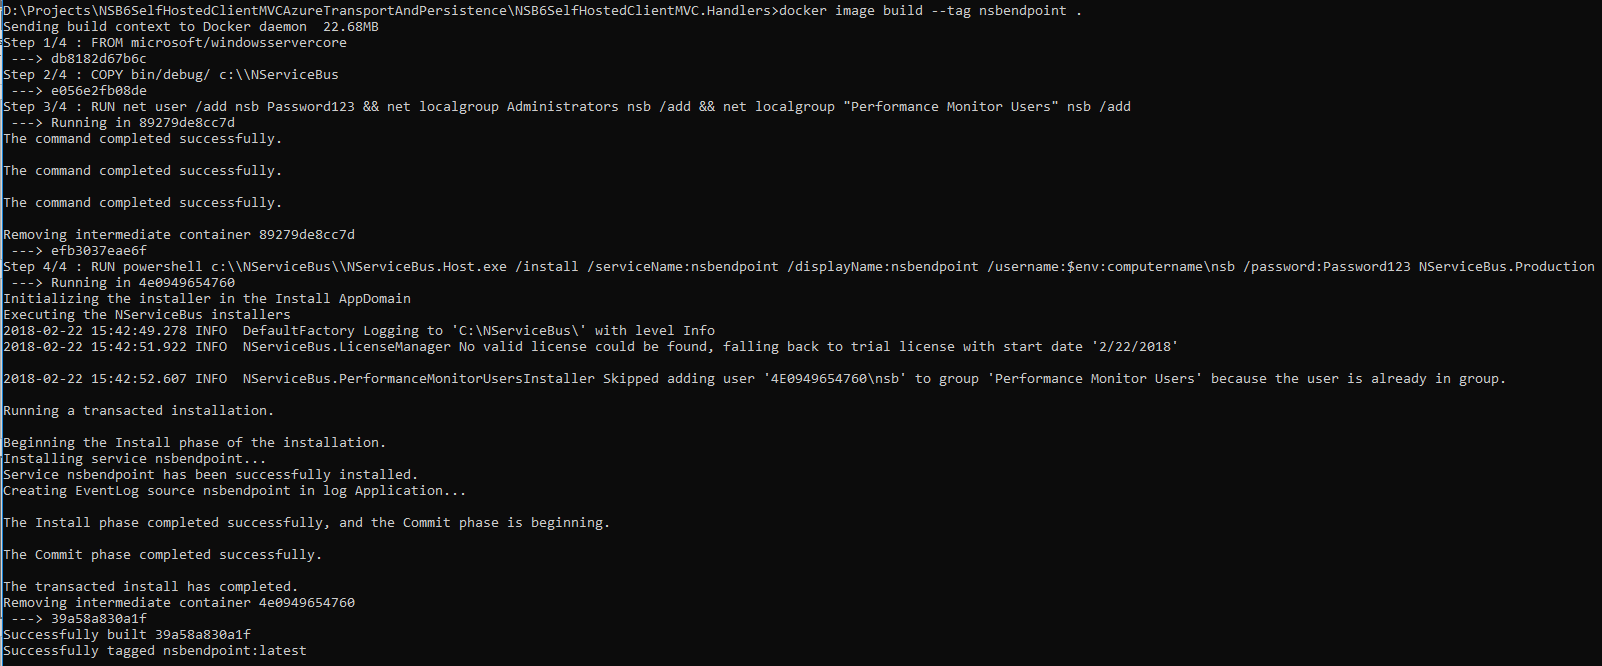
Again, we can pretty much trace the output of the console as it works its way through the Dockerfile to build the the "nsbendpoint" image.
Let's look at the images using Docker. Issue the following command:
docker images
This command shows all images created in your local images repository.

With both of our images built, it's time to fire up containers from each of the images and run our application.
Running Containers
Finally, we get to run containers! We're going to start with the endpoint container first.
Check that you're still in the NSB6SelfHostedClientMVC.Handlers directory, then issue this Docker command:
docker run -it nsbendpoint powershell
We're telling docker we'd like to run a container based on the nsbendpoint image. We're using the -it flag to tell Docker we'd like to run the container in an "interactive" mode which means we're going to be "bound" to the console of the container when it spins up. We pass in powershell at the end to tell the captured console what we'd like to execute when the container starts. When the container starts, you should see something like this:
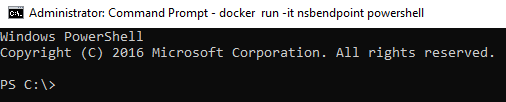
What you're looking at is the console of the running container, running powershell. You're in the running container. Note the title of the console. It shows the Docker command issued that started the container.
Next, let's check to see if the NServiceBus endpoint is up and running. Issue this powershell command followed by the windows service name:
get-service nsbendpoint
You should see output similar to this:
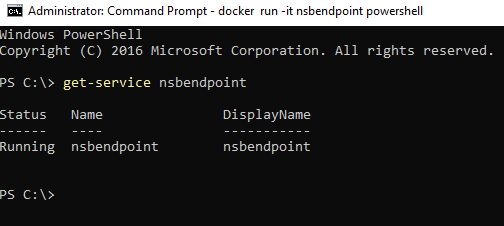
the output shows that the nsbendpoint service is up and running. Now that we have our running endpoint in a container, it's time to fire up the website's container and send a command to the endpoint.
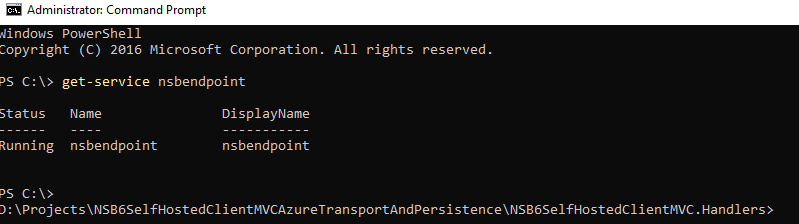
But first, we need to return to our host's command line. How do we do that? We're "bound" to this container's command line because we started the container using -it. We need a way to leave this container so we can return to our host's command line, but we want to keep the container running.
To exit the container without closing it, type: ctrl P+Q, and you will be returned to your host's command line.
If you type
exitwhile on the container's command line, you'll exit not only powershell and the container's command line, you'll also stop the container.
We want to keep the container running for now. Your output should look like this:
To confirm the container is still running, issue the following command:
docker ps

docker ps will show you all running containers on your host. As we've only started the nsbendpoint container, that is the only one showing up.
Back on your host's command line, navigate to the NSB6SelfHostedClientMVC directory and issue the following command:
docker run -d -p 80:80 nsbmvc
We're using different parameters in our run command than we used for running the "nsbendpoint" container. The -d parameter tells Docker to start the container in "detached" mode, meaning we won't be "bound" to the console of the container when it spins up. Basically, we're letting the container start and run in the background. We're using the -p parameter to map port 80 in the container to port 80 on our host. That way, we'll be able to open a browser on our host and browse to the website running in the container. Your output should look like this:

issue a docker ps command and you should see both containers running:

Note the PORTS section of the container information, and you can see the port mapping specified when starting the "nsbmvc" container.
Running the Application
Now that both containers are up and running, we need to navigate to the web site's home page in order to sent the command to the NServiceBus endpoint. But how do we "get" to the website running in the container?
If you remember, when we started the website container, we mapped port 80 on the host to port 80 on the container, so we know it's possible to get to website... but we still need a URL to navigate to.
To get a URL, we need to get the IP address from the running "nsbmvc" container. This will require two steps.
First, type docker ps on the command line and copy the CONTAINER ID of the "nsbmvc" container.

Next, issue this command:
docker exec -it [CONTAINER ID] cmd
substituting the [CONTAINER ID] for your running website container id you just copied from the console.

in the screen-grab above, notice I did not have to use the full container id. You can usually use the first two or three characters of the id and Docker will be able to identity the container.
You are now on the command line of the "nsbweb" container. Type ipconfig and copy the IP address from the console. This is the IP address we'll use in the browser to navigate to the running website in the container.
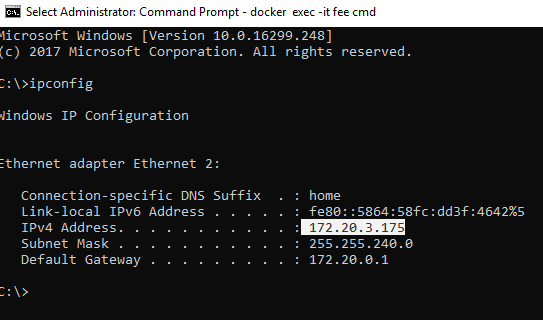
Exit the container by hitting ctrl P+Q to keep the container running.
There is a quicker way to get the ip address of a running container. After getting the container's id using
docker ps, issue this command:
"docker inspect --format="{{range .NetworkSettings.Networks}}{{.IPAddress}}{{end}}" [CONTAINER ID]".
The advantage of using this approach is you don't have to attach to, then detach from the running container.
Paste the IP address into your browser and you should see the default MVC homepage appear after the website initializes in the container.
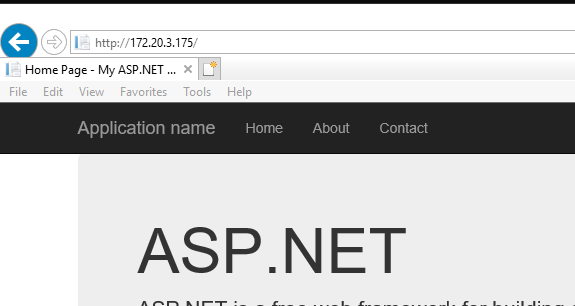
We've successfully navigated to the home page of the website running in the container! So how do we know that the command was sent and handled by the endpoint running in the other container? You guessed it, we need to go into the "nsbendpoint" container and take a look.
Run docker ps to list the running containers, copy the CONTAINER ID of the "nsbendpoint" container, then issue this command:
docker exec -it [CONTAINER ID] cmd
This will put you on the command line of the running "nsbendpoint" container.
Next, cd NServiceBus, then type: dir *.txt. This should show you the NServiceBus log file that was created when the endpoint started in the container. Copy the filename.
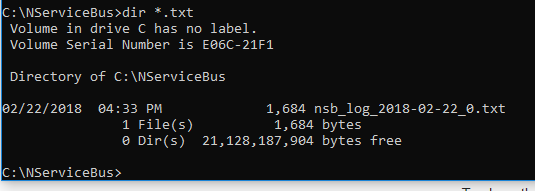
At this point, you should only have one log file, but if there is more than one, pick the one with the most recent date in the name and issue this command:
more [LOG FILE NAME]
Look for the following line near the end of the log file:
2018-02-22 16:33:50.307 INFO NSB6SelfHostedClientMVC.Handlers.TestCommandHandler handled TestCommand at 2/22/2018 9:33:50 PM (UTC)
If you remember from the MVCClient.Handlers project, the TestCommandHandler writes to the log to when it handles the TestCommand message.
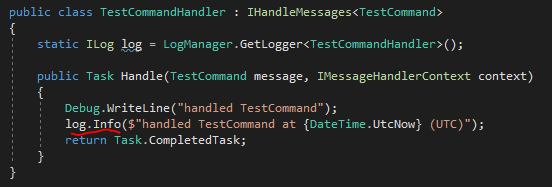
You can see in the log file that TestCommand, which was sent by our "nsbmvc" container was successfully handled by our running NServiceBus endpoint in our "nsbendpoint" container.
Success!
Cleaning Up
Time to stop and remove those containers that you just worked so hard to get set up and running. Here's how.
- type
docker stop [CONTAINER ID]for both the "nsbmvc" and "nsbendpoint" containers
once stopped, you can issue a docker ps command again and you'll see both containers are no longer running.
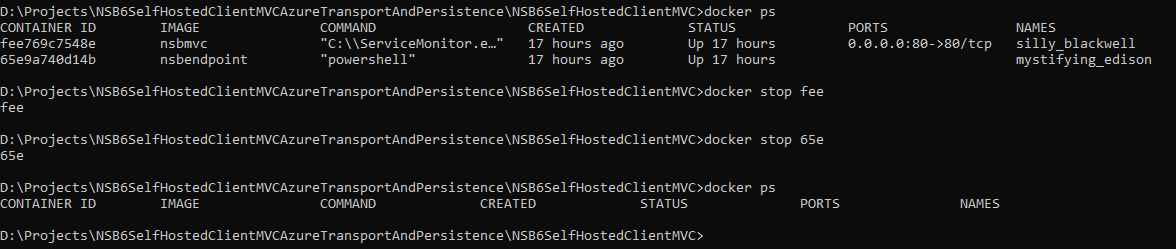
HOWEVER, the containers have not been removed from your system! Type docker ps -a and you'll see both containers listed.

type docker rm [CONTAINER ID] to remove each container.

Type docker ps -a again and you'll see the containers have been removed.

If you're mourning the loss of your containers, don't fret! Remember, we still have the images that those containers were based on. With those images, we can quickly fire up the containers again by using the docker run command.
Wrap-Up
Over three blog posts:
- we've examined an NServiceBus solution with a send-only endpoint ("nsbmvc") which sends a command to a handler in another endpoint ("nsbendpoint").
- we learned how to set up Azure Storage Emulator to procure the Azure resources needed by the configured NServiceBus transport and persistence mechanisms.
- we moved onto using "real" Azure resources by setting up a Resource Group and configuring a Storage Account to procure the Azure resources needed by the configured NServiceBus transport and persistence mechanisms.
- we learned about Dockerfiles and .dockerignore files, built images, and then ran our application in containers using Docker.
I hope you found the posts helpful and/or informative and by all means, please leave comments to correct/improve my Docker skills.
Next Steps
Learn to use Docker Compose in Part 4
I plan on continuing working on the solution as well as improving my Docker skills in conjunction with it. Some planned future blog posts for this set up include:
- utilize Docker Compose
- change NServiceBus persistence from Azure Storage to Sql Persistence. Changing to this persistence will require two things:
- configure a new image for and containerize a Sql Server instance
- use Outbox to emulate distributed transactions
- when MSMQ is available on windowsservercore (right now, it's only available on the "Insider's build"), switch the transport from ASQ to MSMQ.