

I'm usually not the type of person who gets excited about about features that are still in preview, or someone who writes blog posts about technology that I haven't used at scale, but today I'm not that person ;)
Today, I am super-excited about Bicep, a language for declaratively deploying Azure resources.
If you've been working with ARM templates and/or the Azure CLI to provision Azure resources, read on to see how Bicep can up your DevOps game.
What Is Bicep?
Just entering 0.3 Preview, Bicep is a language for declaratively deploying Azure resources. Bicep transpiles to a standard ARM template with the advantages of type safety, Visual Studio Code tooling, modularization, loop structures, string interpolation, reverse engineering from ARM and Azure CLI integration.
For someone like me who has been using the Azure CLI to provision Azure resources, who gets a headache every time I look at an ARM template, and just doesn't have the time (nor the motivation) to learn Terraform, Bicep is a welcome addition to the current options offered up by Azure DevOps.
If you're tired of scrolling through ARM files that are hundreds of lines long, dealing with clunky syntax for parameters and string concatenation, and the overall "noise" of json, then Bicep is for you.
In this post, I'm going to walk you through a super-simple example of how to provision Azure resources using Bicep.
In order to follow along, you'll need to:
- download and install the latest version of Visual Studio Code
- install the Bicep Visual Studio Code Extension
- download or update to the latest version of the Azure CLI
- download and install the Bicep CLI
When you have everything in place, you can start to use Bicep.
Using Bicep
Following the KISS principle, let's focus on provisioning a Resource Group, an App Service Plan and an App Service in Azure.
Provision the Resource Group
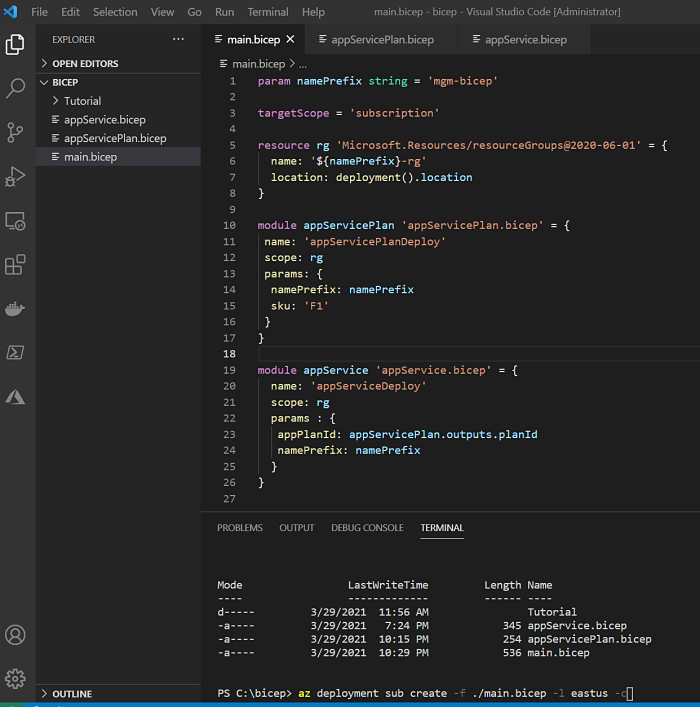
Start by creating a main.bicep file, which will "orchestrate" the provisioning of the three resources:
param namePrefix string = 'mgm-bicep'

targetScope = 'subscription'

//create resource group
resource rg 'Microsoft.Resources/resourceGroups@2020-06-01' = {
  name: '${namePrefix}-rg'
  location: deployment().location
}

// create app service plan
module appServicePlan 'appServicePlan.bicep' = {
 name: 'appServicePlanDeploy'
 scope: rg
 params: {
  namePrefix: namePrefix
  sku: 'F1'
 }
}

// create app service
module appService 'appService.bicep' = {
  name: 'appServiceDeploy'
  scope: rg
  params : {
   appPlanId: appServicePlan.outputs.planId
   namePrefix: namePrefix
  }
}
Starting at the top of the file, namePrefix is a variable that I'll prefix all my resource names with. targetScope defines in which scope Bicep will run. You can check out the list of available scopes here. If omitted, the scope default is resourceGroup
Now we get into the actual provisioning work. The first resource to create is the Resource Group
resource rg 'Microsoft.Resources/resourceGroups@2020-06-01' = {
  name: '${namePrefix}-rg'
  location: deployment().location
}
Let's break this file down starting with the first line.
resourcetells Bicep that you want to provision a resource. It is followed by information about the type of resource you want to provision.rgis referred to as a symbolic name. It's value is how other bicep file(s) with refer to it. This is not the name of the resource that will be created in Azure.'Microsoft.Resources/resourceGroups@2020-06-01'is the type of resource to create. In this case it's a resource group (/resourceGroups).@2020-06-01is the version of the API against Bicep will do its work.
Moving on
nameis a required parameter that will become the name of the provisioned Azure resource. Note the use of Bicep's string interpolation syntax,'${namePrefix}-rg'. This is welcome improvement over string concatenation in ARM templates.- the
locationparameter value,deployment().locationis an ARM function which, based on how it's being used, will pass a value from a command line invocation ofaz deployment. The value represents the Azure resource location (aka,eastus).
Provision the App Service Plan
Next, we provision the App Service Plan. This is done using the module keyword. The module keyword acts as a "pointer" to another bicep file which contains the directives for provisioning the App Service Plan. Modules can be strung together to promote code reusability and encapsulation of provisioning logic for different resource types.
module appServicePlan 'appServicePlan.bicep' = {
 name: 'appServicePlanDeploy'
 scope: rg
 params: {
  namePrefix: namePrefix
  sku: 'F1'
 }
}
Looking at the first line
moduleis a pointer to another bicep fileappServicePlanis the symbolic name for this resourceappServicePlan.bicepis the name of the bicep file which contains the provisioning logic.
Moving on
namebecomes the resource name in Azure.scopepoints back to the resource group's symbolic name (rg).paramsis a list of parameters you pass into the bicep file. In this case I'm passing thenamePrefixparam so all my resources will begin with the same name and theskuso I can create the App Service Plan on the free tier (F1).
Now that we know how to use the module keyword, create a new file called appServicePlan.bicep in the same directory as main.bicep file. This is the file that will do the App Service Plan provisioning work.
param namePrefix string
param sku string

resource appPlan 'Microsoft.Web/serverfarms@2020-06-01' = {
  name: '${namePrefix}-appserviceplan'
  location: resourceGroup().location
  sku: {
    name: sku
  }
}

output planId string = appPlan.id
The two param values at the top are passed to the prefixName and sku properties from the main.bicep file. Name and location are required values (enforced by Visual Studio Code's intellisense). Again, we see the resource keyword at work.
The location parameter's value resourceGroup().location is a built-in Bicep function you can use to get a hold of the resource group's location to use it while provisioning other resources under that group.
The output keyword allows you to capture artifacts created by resource provisioning and easily share those values with the rest of your bicep files. Very useful for connection string and configuration values where downstream resources depend on those values so they can be successfully provisioned.
In this case, the appPlan.idof the creted App Service Plan is output value.
Provision the App Service
Returning to the main.bicep file, it's time to provision the App Service
module appService 'appService.bicep' = {
  name: 'appServiceDeploy'
  scope: rg
  params : {
   appPlanId: appServicePlan.outputs.planId
   namePrefix: namePrefix
  }
}
Most of the syntax and values should look familiar by now. Note the use of the appSerivicePlan.outputs.planId from the output keyword in the appServicePlan.bicep file. This is an example of downstream resources relying on provisioning artifacts from earlier resources... aka, you need a way to tie the App Service to an App Serivce Plan to create it.
Create a new file called appService.bicep in the same directory as main.bicep with this code
param namePrefix string
param location string = resourceGroup().location
param appPlanId string

resource namePrefix_site 'Microsoft.Web/sites@2020-06-01' = {
  name: '${namePrefix}-appservice'
  location : location
  properties: {
     serverFarmId: appPlanId
  }
}

output siteUrl string = namePrefix_site.properties.hostNames[0]
Most of the syntax should be familiar by now. Note the use of a default value for the location parameter and the use of the output parameter for the siteUrl of the created App Service.
Now that all three files are ready, what can we do with them?
Using Bicep Files
You can use the bicep files to provision Azure resources via the Azure CLI, but before we do that, let's see how to transpile the bicep files into an ARM template.
Building an ARM Template with Bicep
Open up Visual Studio Code and open the directory where you saved your bicep files (main.bicep, appService.bicep, appSerivcePlan.bicep)

Then type the following command in the terminal.
bicep build .\main.bicep
You should see a main.json file appear in the Explorer window. For brevity's sake, I'm not going to paste the output into this blog post, but my transpiled ARM template came in at 137 lines long. The main.bicep file is 26 lines long.
The ability to encapsulate pieces of provisioning logic into separate Bicep files along with Bicep's much more terse syntax make it much easier to work with and understand than ARM templates.
Enough looking at ARM templates, lets deploy our resources to Azure!
Deploying to Azure Using Bicep
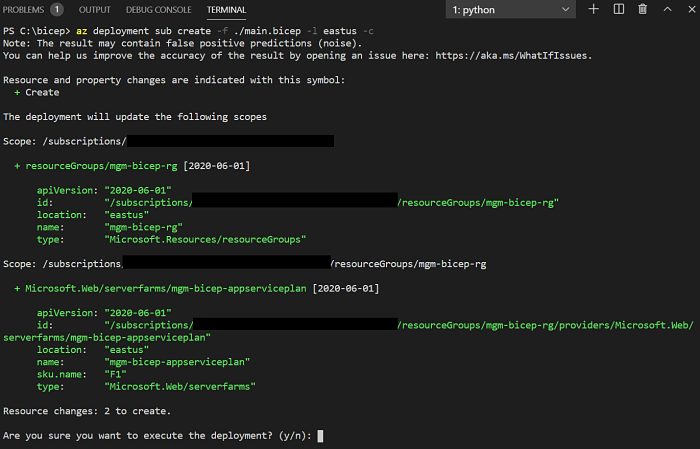
To deploy resources to Azure, we'll use the Azure CLI via the Terminal tab of Visual Studio Code.
Navigate to where you saved all three of your bicep files (main.bicep, appService.bicep, appSerivcePlan.bicep) and type the following command in the terminal, replacing -l eastus with the location nearest to you.
az deployment sub create -f ./main.bicep -l eastus -c
The output in Visual Studio code will show you what will be created if you answer answer y to "are you sure you want to confirm this deployment?" Go ahead and choose y
When the deployment is finished log into your Azure Portal to take a look at your newly provisioned resources (and, don't forget to clean up).
In Closing
This blog post introduced you to the capabilities of Bicep, but I've barely scratched the surface. A great video introduction for Bicep is available via Microsoft Docs Bicep Overview page. Also an excellent Beginner Bicep tutorial is available here.
Although it's still in preview, Bicep is already gaining incredibly momentum and I wouldn't be surprised to start seeing more tooling, first class Azure DevOps support and other "services" spring up around Bicep.